|
Operating Instructions
Our standard 7-meter Pulse Sealer is used to produce a 1-inch wide by 7-meter (280-inch) heat seal. This machine was retrofitted with a tri-seal insert such that each seal consists of 3 1/4-inch wide seals, each 7-meter in length. Additionally, each of the 3 seals were separated by a no-seal area of 7/8-inch as shown in the illustration below.
Each of the seals will also seal all three layers (2 gray + 1 PE/Plastic). Without flange-clamp option, wrinkling will be noticeable in the no-seal areas. This same machine can be retrofitted with other inserts to produce virtually an unlimited variety of heat sealing patterns using this same machine (some restrictions may apply).
Please read all procedures and instructions before using the machine.
Operating Set-Up Procedures:
- Turn on the Safety Switch. Remove any debris from the sealing area.

- Make sure compressed air is connected to the machine and that the Rocker Valves are on.
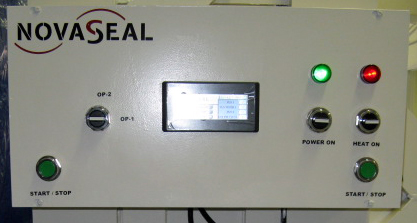
- Turn on the Power Switch. The Power Switch is located on the Control Panel to the right of the HMI Screen. When the Power Switch is ON, the HMI Screen will turn on as well as a Green Indicator lamp located above the switch.
- Next select the number of Operators. OSHA safety requires that each operator be accounted for, especially operators that are feeding material into the machine. The Operator Selector Switch is located to the left of the HMI Screen. By the way, the HMI Screen will confirm your selection. By selecting the default 2 Operators, the right side of the machine becomes active. On the right side of the machine two functions are available ... activation of Right Plunger and activation of the Press.
- Turn on the Heat On Switch. This switch is located to the right of the Power On switch on the Control Panel. Red Indicator lamp will illuminate. And Heat On radial button will activate on the HMI Screen (Main Menu).
Sealing / Operating Instructions:
- The machine may be operated with one or two operators. Two operators is the de
 fault. Settings for one operator were included should the indexer/puncher attachment be selected. With two operators, we suggest one operator be at either end (left and right). It is our understanding that a large table or group of tables are located between the two operators and positioned in front of the machine. This table will hold the PE/Plastic material. Operators to feed and align PE/Plastic material between Upper and Lower Sealing Bars. fault. Settings for one operator were included should the indexer/puncher attachment be selected. With two operators, we suggest one operator be at either end (left and right). It is our understanding that a large table or group of tables are located between the two operators and positioned in front of the machine. This table will hold the PE/Plastic material. Operators to feed and align PE/Plastic material between Upper and Lower Sealing Bars.
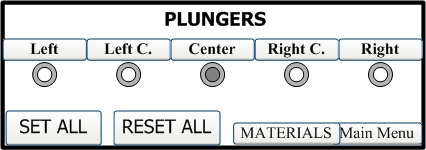
- When positioned, operators may elect to activate Plungers. Plungers are pneumatically activated rods with rubber ends that provide pressure onto the PE/Plastic material against the metal shelf overhanging the front of the machine. There are 5 Plungers. One at the center of the machine, and two at either side of the center. All 5 Plungers may be controlled by the operator located near the Control Panel. The operator located near the right side of the machine may operate only the Right Plunger. To operate the Plungers from the Control Panel, from the Main Menu, touch Plungers. The screen shown below will be activated. In this sample screen, the “Center” Plunger is activated.
 To activate plungers individually, touch the screen for the corresponding Plunger. To deactivate, touch again. To activate all 5 Plungers at the same time, touch “Set All” on the screen. With 2 Operators selected, the Operator at the right side of the machine may push the center green button to activate and de-activate the Right Plunger. To activate plungers individually, touch the screen for the corresponding Plunger. To deactivate, touch again. To activate all 5 Plungers at the same time, touch “Set All” on the screen. With 2 Operators selected, the Operator at the right side of the machine may push the center green button to activate and de-activate the Right Plunger.
- Once the Plungers are holding the PE/Plastic in position on the table, align two layers of the gray material over the edge (between the sealing bars) of the the PE/Plastic material. We suggest that prior to positioning the PE/Plastic material, your operators unroll two layers of the gray material and position the two layers on the wooden table inside the heat sealer. This way it is easier to relocate the two layers and align them on top of the PE/Plastic material.
- After all materials are aligned, you are ready to heat seal all three materials. Begin by selecting the pre-programmed material or by entering heat sealing parameters via the default key pad entry. Refer to PLC/HMI Programming/Operations section. The heat sealing values shown on the Main Menu refer to the material selected and shown above those numbers. Heat sealing is accomplished by a combination of two basic variables ... sealing times and sealing press pressure. The press pressure values shown in Set-Up together with sealing parameter values shown here provided good results prior to shipping the machine.
- To activate the sealing press, each Operator needs to press and hold the two green buttons located on both sides of the machine. These buttons are labeled “Start/Stop”. Two buttons need to be pressed to activate the press. Either button pressed will act as an E-Stop and end the heat sealing process. This means that the Upper Sealing Bar will immediately rise, and heating terminated.
- As the machine progresses through sealing parameters, pulsed sealing is taking place. Upon completion of the sequence, the machine will automatically stop the heat sealing process and lift the Upper Sealing Bar. At the same time, the machine will also automatically reset any and all Plungers to their upright position. Depending on the condition of the Teflon Coated Fiberglas, the sealed materials may stick to either Upper or Lower Sealing Bar. Gently urge the sealed material to remove it.
|