Maintenance includes all aspects to proper maintain the EndSealer. Following these maintenance instructions will provide optimal operating conditions for the EndSealer.
A. Replacing TCF Material. Teflon Coated Fibreglas (TCF) is the brown material that surrounds the Heat Die. TCF consists of two components ... teflon and fibreglas. Teflon assures the heat die doesn’t “stick” to the shade material you desire to seal. Fibreglas is a layer that protects the teflon from burning away. The TCF material referenced herein includes a layer (or laminate) of teflon on both sides of the fibreglas, so there is no orientation of the TCF. The TCF that surrounds the Heat Die is 5mil in thickness. This material can be purchased from Nova Products in the size needed to protect the Heat Die, or purchased from any other supplier in sheet form. Refer to Supplies for purchasing TCF material.
When the TCF Material appears to “stick” to the sealed material or if discoloring occurs when sealing, it is time to replace the TCF Material. Replacing TCF Material by following the steps below.
1. First Step is to turn off the power to the EndSealer. Next wait for the Heat Die to completely cool down. You will need to touch the Heat Die when replacing the TCF, so it is important that the Heat Die is cool to the touch.
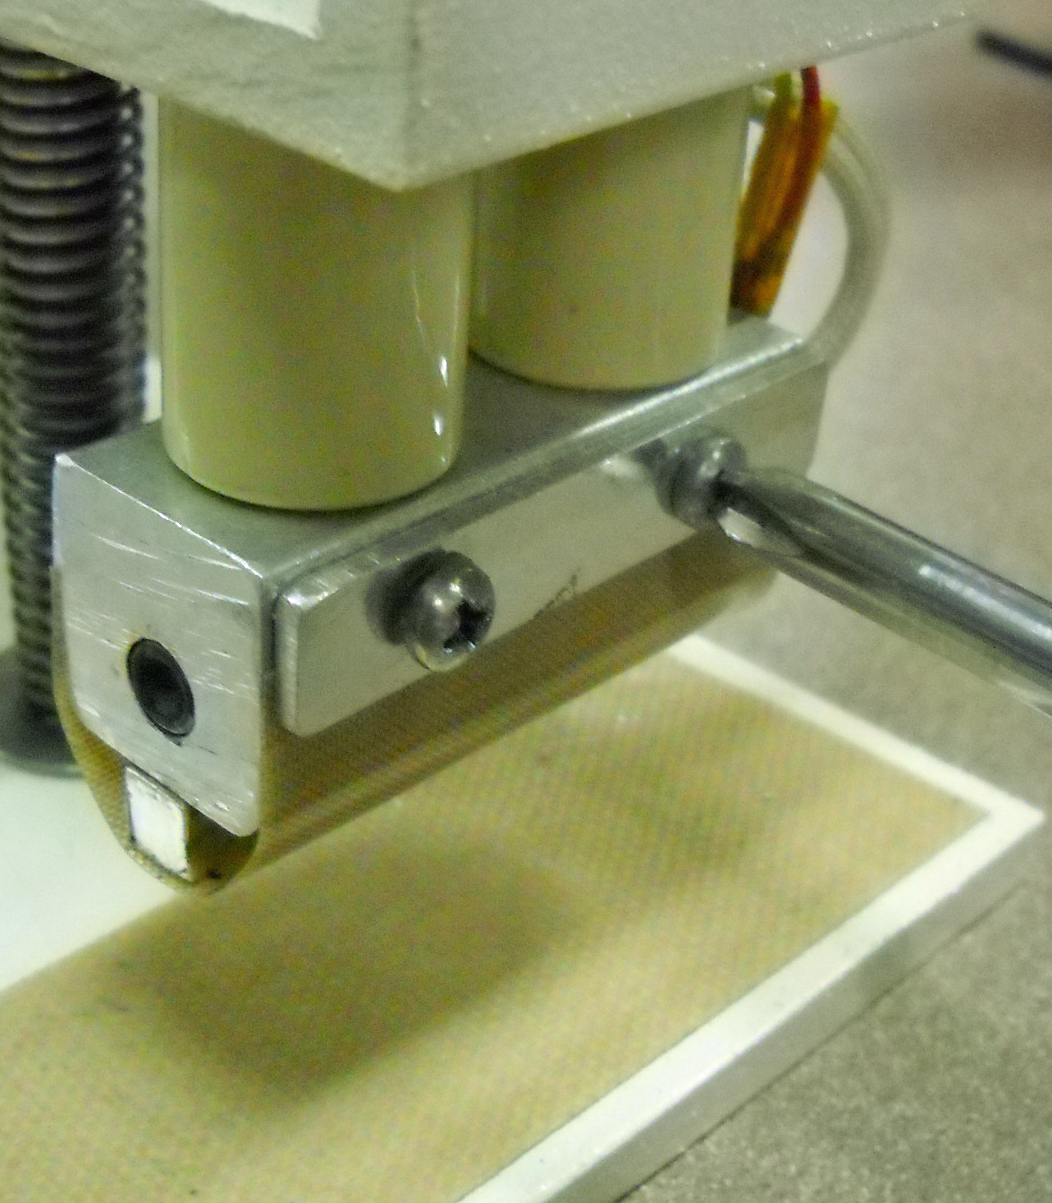
2. Using an Offset Phillips Screwdriver or similar with a #1/#2 Phillips End, loosen the screws holding the TCF Plate against the TCF Material to the rear of the Heat Die, as shown in the photo to the left.
3. Using the same Offset Screwdriver or a standard Phillips Screwdriver, loosen the screws holding the TCF Plate against the TCF Material on the front of the Heat Die, as shown in the photo on the left.
4. When the screws holding both TCF Plates have been loosened, use a screwdriver with a slotted blade to gently pry loose both TCF Plates from Heat Die. Gently remove the TCF Material.
5. Using the removed TCF Material as a template or guide, cut new material of the same size from provided TCF material sheet or strip.
6. Insert the new TCF Material, starting in the rear, then tightening TCF Plate. Next wrap the TCF Material around the bottom of the Heat Die and slide into the space between TCF Plate and Heat Die in the front of the Heat Die, then tighten screws holding the TCF Plate to the Heat Die.
Or view a short video:
B. Replacing TCF Pad. The TCF Pad is also a Teflon Coated Fibreglas material. However for this application, we used a TCF adhesive material, and the TCF Pad material is 14mil thick. When the TCF Pad appears to “stick” to the sealed material or if discoloring occurs when sealing, it is time to replace the TCF Pad.
Replacing TCF Material by following the steps.
1. Turn off the power to the EndSealer. Next wait for the Heat Die to completely cool down. Your hand will come within close proximity to the Heat Die when replacing the TCF Pad, so it is important that the Heat Die is cool to the touch.
2. Remove the TCF Pad by peeling the adhesive backed strip from the EndSealer base plate.
3. Replace TCF Pad by simply cutting off the correct length to replace the TCF Pad material removed, remove the backing strip and affix the TCF Pad adhesive strip in position.
C. Replacing Heating Element. Heating Elements will wear with use and, depending on many factors, may need to be replaced within three months or within five years or longer. The Heating Element is a cartridge heater. The cartridge heater is located inside the Heat Die. It is not easy to remove the cartridge heater. We use internally placed screws to hold the Heating Element in place. To remove the cartridge heater, you will first need to remove the internal screws. To do this, first turn off the power and allow the Heat Die to completely cool to touch. Next, remove the two screws below the Press Pad. Removing the two screws will drop the Heat Die assembly. Remove the ceramic Insulatorsby turning them counter clockwise. If you are lucky, the ceramic Insulators will remove the screw holding them to the Heat Die as well. If not so lucky, then remove the screws partially. Next gently push the cartridge heater out of the hole they rest inside of. Replace Heating Element, and reverse the order to assure Heating Element is secured inside of the Heat Die hole. If you prefer not to replace the Heating Element yourself, send Novaseal the EndSealer and we’ll replace it for you. Heating Elements are available for purchase in our supply section.